A layer shift shows as an edge in the middle of the print: from a certain height the part sits offset sideways, and everything above is displaced against the lower part. The reason: most printers use stepper motors without position feedback. If a step is lost, the controller does not notice. It simply keeps printing, just in the wrong place.
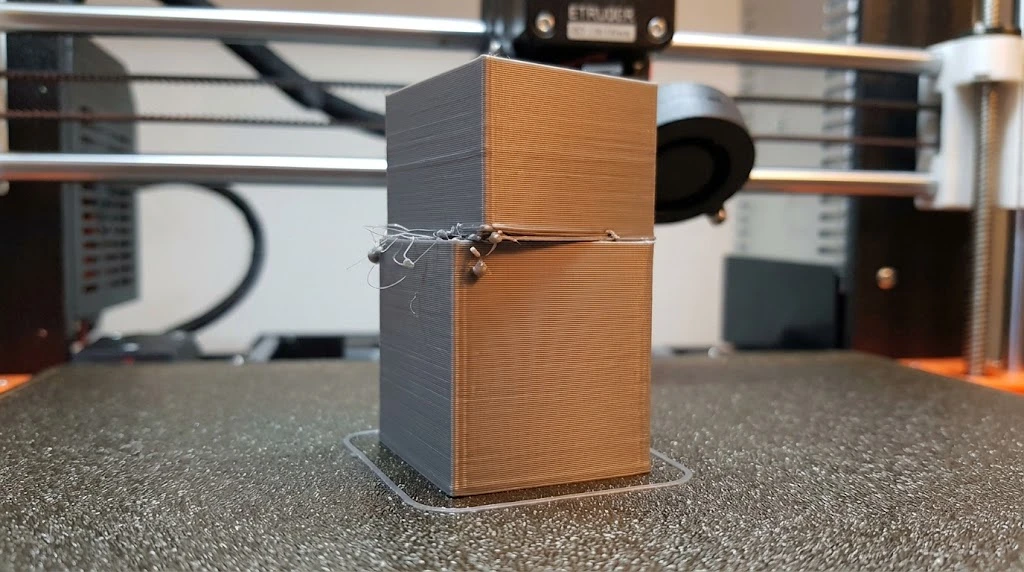
In 30 seconds
The most important measures, sorted by likelihood. Change only one thing at a time and print again.
- Check the set screws of the belt pulleys. If the pulley sits loose on the motor shaft, it slips on direction changes. This is one of the most common causes.
- Check the belts. Not too loose, not too tight. On CoreXY both belts must have the same tension.
- Lower acceleration and travel speed. About a quarter less is enough for a first test.
- Avoid collisions with the part. Infill without crossings and a small Z hop.
- Keep the electronics cool. The fan on the mainboard must run.
How to tell the cause
- The shift happens in the same height and direction on every print: the part or the slicer settings are to blame. The nozzle hits a curled-up area or a build-up of material.
- The shift comes at random and often only after hours: mechanics, belts or electronics that get warm.
- Only one axis is affected: the problem lies with the belt, pulley or motor of that axis. On a printer with a moving bed it is usually the Y axis.
- Everything above the edge is evenly displaced: steps were lost. An edge that slides back again points more to a jolt or a brief knock.
Step 1: Check the mechanics
Switch the printer off before you touch anything.
- Set screws: Use an Allen key to check that the screws on the motor belt pulleys sit firmly on the flat side of the shaft.
- Smooth running: Move the print head and the bed slowly by hand with the printer off. There should be no jerks or stiffness.
- Bed and plate: Is the bed seated firmly, are the plate clips fine?
- Cables: Does a cable or cable chain catch on anything as the head moves?
Step 2: Belts
A belt that is too loose skips over the pulley teeth under strong acceleration. One that is too tight creates a lot of friction at the bearings and overloads the motors. The belt should be taut, but not strung like a guitar string. Many manufacturers give a frequency value for the pluck test that you can check with a tuner app. Follow that figure and not one from the internet, because it depends on the printer. On CoreXY printers both belts must have the same tension. On Bambu printers, follow the manufacturer's instructions.
Step 3: Speed and acceleration
The motors have to brake the mass of the bed or print head at every change of direction. If acceleration is too high, they lose steps.
- Lower acceleration and jerk (or junction deviation) in steps, for example by a quarter.
- On fast printers, lower the travel speed noticeably as a test. If the fault disappears, raise it again in small steps.
Step 4: Collisions with the part
If the shift always happens in the same place, the nozzle probably hits the part.
- Crossing infill: Patterns such as grid or triangles cross lines on the same layer height. Material can build up at the crossings. Patterns without such crossings, like gyroid, cross hatch or adaptive cubic, are an option if you suspect the nozzle catches on them. They are no cure-all, the mechanics come first.
- Curled edges (curling): Overhangs cool unevenly and curl upwards. The nozzle catches on them. More cooling helps, and so does a Z hop of about 0.2 to 0.4 mm on travel moves.
- A Z hop can encourage strings with some filaments. A spiral or slope Z hop is gentler than a vertical jump.
Step 5: Electronics and heat
- Check that the fan on the mainboard runs and that no cable blocks the airflow over the drivers.
- If the fault only appears after hours, the drivers or motors are probably getting too warm. The drivers then switch off briefly, and steps are lost.
- Only change the driver current if you know exactly what you are doing. Too little current takes the torque from the motor, too much makes motor and driver run hot.
Differences by printer type
- Moving bed (Prusa MK3 and MK4, Ender 3, Neptune, Bambu A1 and A1 mini): The shift usually occurs in the Y axis. The bed with the plate is heavy, and the belt can slip on fast Y moves.
- CoreXY (Bambu X1 and P1, Voron, K1): The shift is often diagonal, so in X and Y together. Causes are unevenly tensioned belts, friction in the idler pulleys and very fast travel moves.
Slicer settings
Names can differ depending on the program version.
Bambu Studio and OrcaSlicer
- Infill pattern: in the process profile under Infill, Pattern.
- Z hop: in the printer settings, Extruder section, Retraction (Z hop when retracting). OrcaSlicer also offers a spiral and a slope Z hop there.
- Acceleration: in the process profile under Speed, Acceleration section, separate for printing and travel.
PrusaSlicer
- Infill pattern: Print Settings, Infill, Fill pattern.
- Z hop: Printer Settings, Extruder 1, Retraction, Lift Z.
- Acceleration: Print Settings, Speed, Acceleration control. The setting appears in expert mode.
UltiMaker Cura
- Infill pattern: Infill, Infill Pattern.
- Z hop: Travel section, Z Hop When Retracted.
- Acceleration: Speed, Enable Acceleration Control, if visible.
If it still persists
- Put the printer on a stable surface. Vibrations and a wobbly table make everything worse.
- Keep firmware and slicer profile up to date.
- Test with a simple cube at half speed. If the fault is gone, it is speed and acceleration. If it stays, it is the mechanics.
- If none of this helps, contact the manufacturer's support.
Further reading
- Fix stringing: fine strings between parts.
- Prevent warping: when corners lift off the print bed.
- Which filament for which purpose: PLA, PETG, ABS, ASA, TPU and nylon compared.
- Teaching Tech Calibration: calibration aids and test prints.
- OrcaSlicer: comes with its own calibration prints.
- Print cost calculator: failed prints cost material and time, enter them as scrap.
- More tools in the directory
All values are rules of thumb and depend on printer and filament. When in doubt, follow your manufacturer's specifications.