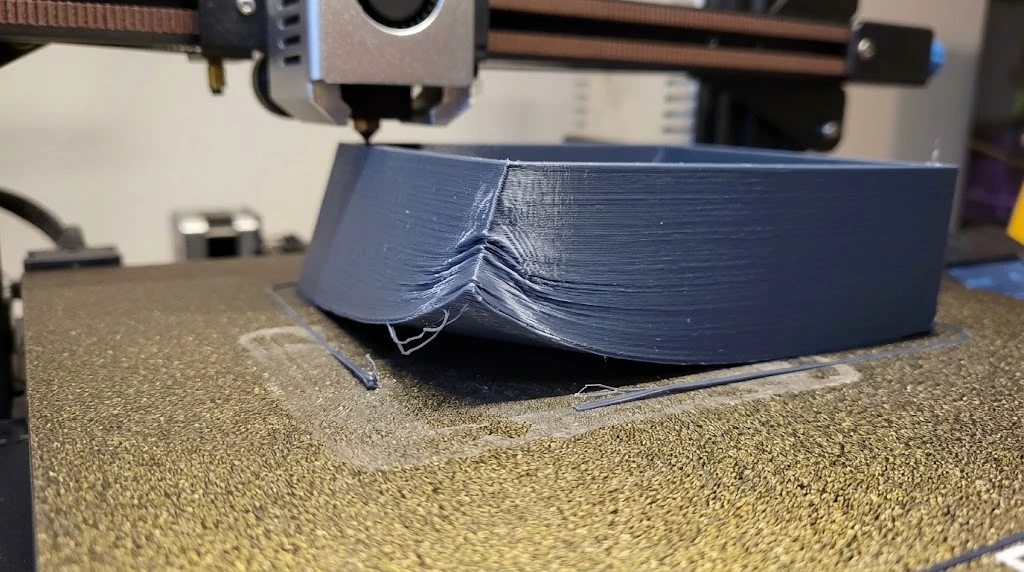
Warping shows as corners or edges of a part bending upwards during the print and peeling off the plate. The reason is simple: plastic shrinks as it cools. The lower layers stick to the warm bed, the upper layers cool faster and shrink. The resulting tension levers the corners upwards.
In 30 seconds
The most important measures, sorted by effort. Change only one thing at a time and print again.
- Clean the plate. With warm water and a little dish soap, then rinse well and dry.
- Set the bed temperature to suit the material. Rules of thumb are below.
- Check the first layer. Too much distance to the plate and too much speed are common causes.
- Enable a brim. A border of 5 to 10 mm clearly enlarges the contact area.
- Keep drafts and cold away. ABS and ASA need an enclosure.
How to tell the cause
- The corners lift in the first few layers: an adhesion problem. Plate, first layer distance or bed temperature.
- It holds at first and lets go only at greater height: tension from cooling. Drafts, fan or a missing enclosure.
- It happens almost only with ABS or ASA: the build chamber is too cold. Close the enclosure and preheat.
- Only the sharp corners lift: tension gathers at the corners. A brim, mouse ears and rounded corners help.
Step 1: Clean the plate
Even fingerprints noticeably worsen adhesion. Wash the plate with warm water and unscented dish soap, rinse thoroughly and dry it without touching the print surface. For light dirt, isopropanol is often enough too. If it still does not hold on a clean plate, the plate or its coating may be worn out.
Step 2: Temperatures by material
These are rules of thumb. The filament manufacturer's figure on the spool takes precedence.
- PLA: bed about 55 to 65 °C. Printing open is fine, avoid overheating. The part cooling fan can run at full speed from the second layer. A clean PEI plate is usually enough.
- PETG: bed about 70 to 85 °C, part cooling fan rather 20 to 50 percent. Careful: PETG sticks very strongly to a smooth PEI plate. A thin coat of glue stick acts as a release agent, otherwise the coating can be damaged when you remove the part.
- ABS and ASA: bed about 95 to 110 °C, part cooling fan off or very low, only for overhangs. An enclosure is mandatory here. Preheat the bed with the enclosure closed for 10 to 15 minutes so the interior warms through. Glue stick or ABS slurry helps as well. ABS and ASA give off fumes while printing, make sure there is ventilation.
- Nylon and polycarbonate: need a closed, preheated enclosure and usually an adhesion aid. Follow the manufacturer's specifications.
Step 3: The first layer
The first layer decides whether a part holds.
- Distance (Z offset): The lines must be slightly fused together, without ridges. Too much distance means the material is not pressed into the plate's texture.
- Speed: Print the first layer slowly, about 15 to 25 mm/s.
- Line width: A wider first layer enlarges the contact area. About 120 to 140 percent of the nozzle width is common, so around 0.5 mm with a 0.4 mm nozzle.
Step 4: Against the tension
- Brim: A border of 5 to 10 mm with 0 mm gap to the part. It is peeled off after printing.
- Mouse ears: Small thin discs, about 0.2 mm thick, only at the sharp corners. They save material and cleanup compared with a brim all around.
- Draft shield: On printers without an enclosure, a wall around the model or a cardboard box keeps drafts out. Windows closed, no ventilation blowing directly at the printer.
- Round the corners: Sharp outer corners collect tension. If you design the model yourself, round them off.
Slicer settings
Names can differ depending on the program version.
Bambu Studio and OrcaSlicer
- Brim: in the process profile under Others, brim type and brim width. For brim type there is an outer-only border (Outer brim only) and a variant where you paint the border by hand only at critical spots.
- The distance between brim and part is called Brim-object gap and should be 0 for adhesion.
- First layer: line width, speed and temperature are in the process and the filament profile.
PrusaSlicer
- Brim: Print Settings, Skirt and brim. Brim type, Brim width and Brim separation gap are there.
- First layer: Print Settings, Layers and perimeters, First layer height; speed under Speed, First layer speed.
- You can adjust the distance to the plate live during the print with the Z adjustment on the printer.
UltiMaker Cura
- Brim: build plate adhesion settings, set the type to Brim, plus brim width.
- First layer: Initial Layer Height, Initial Layer Line Width and Initial Layer Speed.
If it still persists
- Check the plate. An old plate that has gone smooth adheres worse.
- Rotate or split the part. Large flat parts are the most prone.
- Protect the printer from drafts. Even an open window can be enough.
- For the next attempt, first test only the first layer, for example with a flat plate. That saves many hours.
Further reading
- Fix stringing: the sister article about fine strings between parts.
- Fix layer shifts: when layers slip sideways.
- Which filament for which purpose: PLA, PETG, ABS, ASA, TPU and nylon compared.
- Teaching Tech Calibration: calibration aids and test prints.
- OrcaSlicer: comes with its own calibration prints.
- Print cost calculator: failed prints cost material and time, enter them as scrap.
- More tools in the directory
All values are rules of thumb and depend on printer, plate and filament. When in doubt, follow your manufacturer's specifications.